CAGD 330 Classic Car Week 1
Week 1: Classic Car
To
start off, this is my first week modeling my Classic Car, a 1958
Plymouth Fury, for CAGD 330. I started by setting up my reference
pictures in Maya, making sure they're all scaled correctly, and then
outlining my car with a "CV curve tool". It was my first time actually
using this method to model, and I actually like it. I've found it to
help my understanding of how the car parts will connect, and the general
shape I should go for, instead of just trying to match it to a 2D
outline.
Here's the outline reference image I used.
Now with my curves built, I was beginning to have an idea of how much time I would have to put into this project. This car by all means, is not going to be easy. It has a few unique details that I'll have to add in once done, specifically the hood emblem, and "tails"
ex.
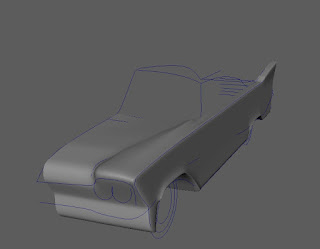
Thankfully there are a lot of reference photos of this car surfing the internet, so the amount of angles I have to study are nearly endless. This is a photo of my curves. I could have made an outline with every detail in the car, but I decided to go for the most important divots, and angles as I could. I only did half instead of the whole car because since they'll be the same on both sides, I can just mirror it once it's fully fleshed out.
This week, I didn't have a chance to fully finish the block-out, but I got the most difficult parts out of the way. I haven't put a lot of edge loops in because I wanted to go with the most minimal topology I could while retaining the shape of my outline as much as possible. During this stage, I was constantly checking with my curve outline, and the image references to make sure I was getting the proportions right.
Here's some extra photos of different angles!
There's
definitely things I have to fix when I start moving on from blocking in
my outline, but for now, I think it holds the car's shape well!


Comments
Post a Comment